Two tools

I’ve been making a ton of cookies the past two days, and thought this would be a good time to talk about my amazing cookie sheet of DOOM!


It measures 21″ x 15″ and *just* fits in my oven:

the oven is cleaner than it looks, swear


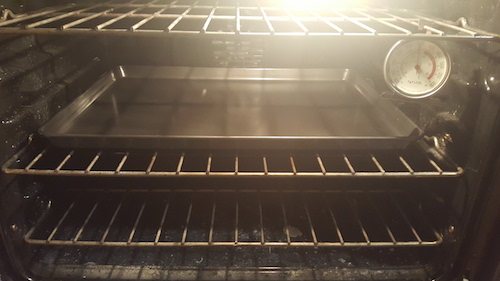
I love it, as it makes making my triple batch of Pumpkin Chocolate Chip cookies much quicker! They also make a mega muffin pan, mega donut pan, mega mini-loaf pan, mega mini muffin pan, and a mega mini fluted pan. Yes, these are all on my wish list now. 🙂

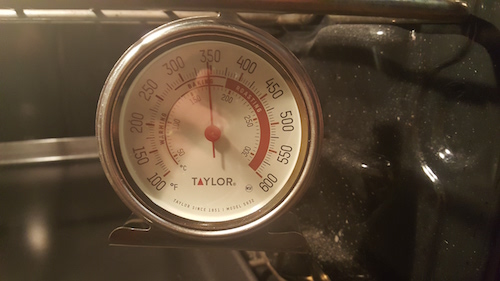
The other tool I wanted to talk about is my oven thermometer. Now, my mother had one decades ago that irritated the hell out of me because I inevitably would knock the thing off every time I put something in the oven. While there are a lot of different options for an oven thermometer, I went with the reliable stand by that my mom had. These people have making thermometers for over 100 years, so I’m going to go out onto a limb and say they’re accurate. 🙂


I found that it is almost a necessity for me now. First, my oven is NOT preheated when it says it is. My oven ‘beeps’ when the preheat cycle is over and lets me know it is now at whatever temperature. But it really isn’t and the thermometer bears that out. It’s almost 100 degrees cooler than it should be!

With the more recipes I’m doing, I want to make sure the temp is accurate. I’m also using it to work on using my oven as a proofing box for yeast breads. I need to know what temp it gets to under “warm”, as it doesn’t say in the book the oven came with. I have some great British recipes, that has everything in celsius, so it’s a quick reference there too!

Parmesan Crusted Chicken

For the love of chicken! This is one of the easiest recipes ever and leaves the chicken juicy. You can alter things slightly with the seasoning of the bread crumbs. Add spice by adding some red pepper flakes to the bread crumbs as well.

If you use too much mayo, the crust that forms slides off the chicken a bit when you cut into it, but just scoop it up and eat!


Print Recipe
Parmesan Crusted Chicken BigOven - Save recipe or add to grocery list
Prep Time 5 minutes
Cook Time 20 minutes
Servings
servings
Ingredients
Prep Time 5 minutes
Cook Time 20 minutes
Servings
servings
Ingredients
Instructions
  1. Preheat oven to 425.
  2. Combine mayo and parmesan.
  3. Lay out chicken breasts on pan. Sprinkle salt and pepper on each breast.
  4. Spread the mayo mixture on the top of each breast.
  5. Sprinkle bread crumbs on the top of each breast.
  6. Bake for roughly 20 minutes. Times will vary with size of chicken breasts and oven fluctuations.
Share this Recipe

Samoa Bundt Cake

I love Girl Scout cookies. LOVE THEM! And I have been known to order cases at a time because … I’m guilty of gluttony. Thin Mints, Samoas, and Trefoils are my absolute favorites. So when I saw this recipe, I knew I had to try it!

Note – I don’t make things pretty but I did try this time.


The taste is what truly matters. And this was pretty damn good! Not *exactly* like a Samoa, but close enough for me to eat more of this cake than I should!

Print Recipe
Samoa Bundt Cake BigOven - Save recipe or add to grocery list
Prep Time 20 minutes
Cook Time 60 minutes
Servings
servings
Ingredients
Cake
Frosting
Toppings
Prep Time 20 minutes
Cook Time 60 minutes
Servings
servings
Ingredients
Cake
Frosting
Toppings
Instructions
Cake
  1. Preheat oven to 350. Grease and flour a bundt pan.
  2. Melt the chocolate in a double boiler or in the microwave until it's smooth when stirred.
  3. Beat the butter and brown sugar together.
  4. Add eggs and beat well.
  5. Add melted chocolate and beat.
  6. Sift together the flour, baking soda, and salt. Add half to the batter along with half the sour cream.
  7. Add the second half of the flour mixture and sour cream.
  8. Add in the vanilla and hot water, mixing on low speed.
  9. Pour into bundt pan and bake for roughly 60 minutes.
  10. Take out of oven (leave the oven on!) and cool for about 15 minutes, then remove cake from pan.
Coconut Topping
  1. Spread your coconut out on a baking sheet. Pop in oven for roughly 5 minutes, stir and then toast for another 5. Keep an eye on it, as you don't want it to burn. It shouldn't take more than 10 minutes total - but you know your oven better than I do!
Frosting
  1. Beat butter and caramel together until smooth. Gradually beat in the powdered sugar.
  2. Add the cream a little bit at a time to get the consistency you want in the frosting.
Put it together!
  1. Frost the cooled cake. It's easier to pop the cake in the fridge to get it nice and cool before frosting.
  2. Gently pat the toasted coconut onto the cake, a little at a time.
  3. Drizzle it with the leftover caramel sauce and hot fudge sauce.
Recipe Notes

I recommend doing the frosting and coconut on a wire rack that has a baking sheet underneath. This will help you from losing too much coconut when you put it on.

Share this Recipe

Potato Soup

A while back, I tested out Paula Deen’s recipe for potato soup. Yeah, not great. Since then, I’ve been testing several different recipes and found one that I really enjoy. And yes, I’ve tweaked it a bit. 🙂

I make this in our crockpot and it dishes up more than enough servings for a family. You can also make this up and then freeze portions in quart freezer bags. I did this recently, when I made a huge pot in our bigger crockpot. It’s about winter here now, so having readily available, homemade soup is a good thing!

Print Recipe
Potato Soup BigOven - Save recipe or add to grocery list
Servings
servings
Ingredients
Servings
servings
Ingredients
Instructions
  1. With your reserved bacon drippings in large fry pan, saute the onions until translucent.
  2. Add flour, stirring to prevent lumps.
  3. Add chicken stock a cup at a time, stirring constantly to prevent lumps and it will thicken as you add them all.
  4. Once all the stock is in, reduce heat to simmer. You can add the potatoes at this time OR use crock pot, put potatoes in crock pot with the thickened stock.
  5. Add all the seasonings and bacon. Let simmer for about 10 minutes - do not let it boil.
Share this Recipe

Parmesan Crusted Tilapia w/Tomato Basil Cream Sauce

I cook a lot of tilapia. It’s the one fish I really enjoy that doesn’t taste ‘fishy’. I found this particular recipe on Pinterest, tried it, and modified it because a) I don’t like frying food*, b) the sauce did not thicken well, and c) I have a better recipe to coat the fish. 🙂

So below is my modified recipe. The fish will taste just as good with or without the sauce, by the way.

*Fried food is good, don’t get me wrong. But it isn’t generally healthy for you and why deal with all the oil splatter to clean up later? As stated elsewhere, I’m lazy.

Print Recipe
Parmesan Crusted Tilapia w/Tomato Basil Cream Sauce BigOven - Save recipe or add to grocery list
Prep Time 10 minutes
Cook Time 20 minutes
Servings
servings
Ingredients
Sauce
Tilapia
Prep Time 10 minutes
Cook Time 20 minutes
Servings
servings
Ingredients
Sauce
Tilapia
Instructions
  1. Sauce: heat oil in small skillet on medium heat. Add garlic and cook for 2 minutes.
  2. Add cherry tomatoes and cook for 2 minutes or so.
  3. Reduce heat to low and add cream and fresh basil. Simmer for 15 minutes. Thicken by mixing cornstarch with a bit of water to make a slurry. Add this to the sauce and stir thoroughly.
  4. Fish: Preheat oven to 375. Spray baking pan with Pam or equivalent.
  5. In shallow dish, combine melted butter, garlic powder, and lemon juice. In another shallow dish, combine panko and parmesan.
  6. Dip each filet in butter mixutre and then roll well in panko mixutre. Place filets in a single layer onto baking pan.
  7. Press any remaining panko mixture onto the tops of the filets.
  8. Bake for 12-14 minutes.
  9. Serve with sauce on top!
Share this Recipe

Poached Pears w/Caramel Cinnamon Sauce

I like pears well enough on their own, but when they are warm like these are, they are even better! For those who don’t like cinnamon (who are you people?!?), you can omit it and just have caramel. Or substitute the cinnamon with something else to flavor. Chili powder, if you like spicy, cardamon, star anise, or just add teaspoon or so of salt for salted caramel!

I made this the other night for the Man and the Girl. She helped with the pears while I did everything else. 🙂 You can use any type of pear you like, I just happened to use Bosc pears.


Print Recipe
Poached Pears w/Caramel Cinnamon Sauce BigOven - Save recipe or add to grocery list
Prep Time 5 minutes
Cook Time 20 minutes
Servings
servings
Ingredients
Pears
Caramel Cinnamon Sauce
Prep Time 5 minutes
Cook Time 20 minutes
Servings
servings
Ingredients
Pears
Caramel Cinnamon Sauce
Instructions
  1. Peel and core pears, leaving stems in tact. Or, peel and cut in half, then core. Your choice.
  2. In a large pan, combine water, sugar, and lemon juice. Bring to boil
  3. Add pears to the boiling syrup. Reduce heat, cover, and let simmer for 10 minutes.
  4. Use this time to make caramel sauce! Put sugar in sauce pan. Use a spatula or wooden spoon, stir sugar over medium high heat until a golden color.
  5. Put butter into sugar and keep stirring!
  6. When butter has completely melted, take off heat and add cream a little bit at a time, still stirring.
  7. Toss in cinnamon, incorporating it complelety. Set sauce aside to cool a bit.
  8. Turn pears and let simmer for another 10 minutes, until they are tender.
  9. Remove pears and pour caramel sauce over and serve!
Recipe Notes

The caramel sauce will thicken as it cools. It shouldn't cool too much in 10 minutes, but enough to be able to pour over the pears. If it has thickened too much, warm it up a bit.

Share this Recipe

Tool Review

From time to time, I’ll review some of the tools I use because there are some I really like. 🙂

For a very long time, I did not own a mandolin. I just cut everything with my knife and dealt with them not all being perfectly the same thickness. Nor did I worry about things being pretty – that’s usually what my brother Paul is for when we cook together. However, I finally caved in and bought one, mostly because I’m lazy. Seriously, using one takes half the time of cutting things with a knife.

The one I ended up purchasing is this one:

(Btw, that’s an affiliate link – in case you feel like buying one. A small percentage goes onto an amazon gift card for me, because I spend most of my money on Amazon anyway. LOL)

It works GREAT and comes with a lot of options.

  • The blades are hardened stainless steel and hold their edge. I’ve had mine for a year now and use it frequently and have not noticed any dull spots at all.
  • Simple to adjust in thickness – from 1/16, 1/8, 3/16, and 1/4 inches. 
  • Straight and wavy blades for straight or crinkle cuts, and julienne blades for French Fries or fine julienne strips.
  • The food holder is fine for those who need it (I like living on the edge) and the ‘runway’ is designed well to keep food from sticking.
  • The dial on the side is easily turned to adjust thickness, and also locks it when storing and unlocks it for cleaning.
  • Love the non-slip feet to keep it in place when using and they fold up so it stores flat.

The only thing I wish could be changed about it is the ease of cleaning. The blades come out simply enough to clean, but the rest is all connected together, so makes it a bit awkward to clean after you’ve used it. Still, I recommend it highly!

Zucchini Au Gratin

I love zucchini, which is saying a lot since I don’t like many veggies. Something that my taste buds have changed their mind about over the years. This is why I recommend trying things you may not have like the taste of previously. I do it about every 7-10 years.

Anyway, I like finding new ways to cook it. This is one that looked interesting and it involved cheese, so why not? Adding cheese to most things makes it tastier. However, I can tell you that this particular recipe needs tweaking. I added more cheese, because cheese, but if you prefer less, cut down the amount of cheddar by half.


Print Recipe
Zuchini Au Gratin BigOven - Save recipe or add to grocery list
Prep Time 20 minutes
Cook Time 20 minutes
Servings
servings
Ingredients
Prep Time 20 minutes
Cook Time 20 minutes
Servings
servings
Ingredients
Instructions
  1. Preheat over to 350.
  2. Slice zucchini - about 1/4 inch
  3. Blanch zucchini - see notes below.
  4. Saute onion and garlic in olive oil until translucent.
  5. Add milk, paprika, garlic powder, nutmeg, allspice, salt, and 1 cup of cheddar cheese.
  6. Stir until cheese is melted. Remove from heat and add egg.
  7. Pat dry the zucchini one more time. Lay zucchini out in dish.
  8. Pour cheese mixture over zucchini.
  9. Sprinkle remaining cheddar cheese and fontina over the top.
  10. Crumble up crackers and sprinkle on top.
  11. Cover with foil and bake for 15 minutes. Take foil off and broil for 5 minutes to brown top.
Recipe Notes

To blanch: Set up an ice bath in a bowl big enough for your colander to fit into. Boil enough water that will cover all your zucchini. Once water is boiling, toss in zucchini for one minute. Drain into colander and plunge into an ice bath to stop them from cooking more. Lay out zucchini on paper towels and pat dry. Sprinkle with salt and set aside.

Share this Recipe

Bread – My Nemisis

Confession: I suck at making bread.

Well, I suck at making bread that requires yeast and rising. Regardless of how well I follow directions, do everything little trick I have found, I absolutely suck at getting a bread dough to rise properly. It’s infuriating!

The other day, I attempted to make a focaccia bread. Of course it didn’t rise at all, though I still went through all the steps and did cook it. Taste-wise, it was okay, just dense because of my failure. Yes, the yeast was fresh, had it in a warm spot to rise, etc. ARGH!

I WILL NOT LET THIS THING BEAT ME! I love bread – all types of bread. It’s my fourth favorite food. So I told the Man that he’s going to have to suffer through all my attempts to make bread. He just laughed at me and said he’d help me dispose of all my attempts. He’s such a trooper. 🙂

Crockpot Hot Chocolate

Another Pinterest find that sounded good and thought I’d give it a try at a meeting that the Man and I were having at our house. It was a huge hit and almost nothing left at the end of the night. I doubled this recipe in our 6 quart crockpot.

I’ll be making this quite a number of times throughout our winter!

Print Recipe
Hot Chocolate BigOven - Save recipe or add to grocery list
Prep Time 5 minutes
Cook Time 2 hours
Servings
servings
Ingredients
Prep Time 5 minutes
Cook Time 2 hours
Servings
servings
Ingredients
Instructions
  1. Put everything into your crockpot or slow cooker. Put it on high to start to help melt the chocolate chips.
  2. Check back every 20 minutes or so to stir up the melting chocolate. Turn down to low or 'warm' when all the chocolate has melted.
Recipe Notes

Additional options: have mini marshmallows, candy canes, cinnamon sticks, or even a bit of chili powder for flavoring if desired.

Share this Recipe